

If I saw this blog title, I probably would say “how hard can it be….it’s a flower”. Because flowers come in a wide variety of shapes, sizes, colors, and textures, it can be difficult to execute a compelling shot because one approach does not work for every flower. Flowers have the ability to evoke a wide range of thoughts and feelings. I find orchids curious (the insides look like something alien), gerber daisies happy (they remind me of the sun), roses quiet (I think of misty Victorian rooms), and tulips perplexing (they partially open and it can be tough to get a sense of what is in the flower). One of the things I love about photographing flowers is they are everywhere; you can take pictures even in the comfort of your own home on a rainy Saturday (and you get the benefit of a fresh bouquet to enjoy all week).
There are three things to keep in mind when you photograph a flower:
- What is the subject? One flower or many? A petal or the whole flower? The color contrast within a flower?
- What is the background? Does it enhance or distract?
- What is the light? Does it emphasize and support what you like about the flower?
 Subject: there are different ways to evaluate your subject. Ask yourself what appeals to you; is it the shape of the flower? The color? The texture? The answers to this question will help you determine how close you get, what equipment you use, how you shape the light, and what your camera settings are.
Take this close-up image of an orange rose for example, what appealed to me was the layering of the petals. I knew I needed to be close enough to make that the subject without any other distractions, but not so close I lost the layering. I chose an angle so that the remaining portions of the rose that were in the background were not distracting and there was soft light so there weren’t any harsh shadows. My camera setting for this image were f16, 25 seconds, ISO 200, 100 mm macro lens.
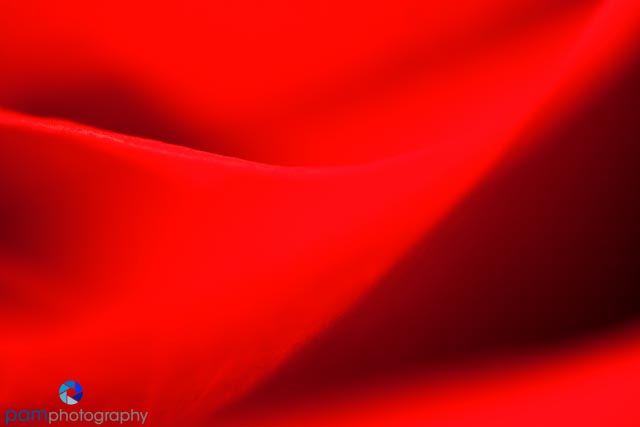
Another example is this abstract close up of a rose petal. It reminded me of a red wave. I reversed a lens on top of my macro lens so it acted like a huge magnifying glass. I made sure I had one part of the petal sharp. I was in a bright room out of direct sunlight to avoid throwing harsh shadows onto my subject or the background.
 Background: simple is usually better. I try to find a simple background in either a complimentary or contrasting color. Make sure there aren’t any hot spots, or things that are brighter than your flower (reflected dew drops, white sky, etc), in the background or they will be distracting. A tip I saw from Tony Sweet is to create your own background. Take some photos of colorful flowers that are out of focus. This will create a wash of color. Then print them in large sizes so you can place it behind your subject. This way it makes it easy to control the background and what appears in focus (you could shoot your flower at f16 so it is all sharp and the background will still be soft and blurry). The camera settings for this image were: f5.6, 1/4 sec ISO 100, 154 mm.
 Light: diffused is usually better. I try to find flowers in the shade or in a bright room outside of direct sunlight. This allows the colors to really shine and does not create distracting harsh shadows. Soft light just seems to go better with the nature of flowers. In this image of a rose bud I positioned myself so the light would bounce off of the back petals.
The camera settings for this image were: f11, 1/50 sec, ISO 1000, 100 mm macro (The ISO high because it was windy day).
Quick tips: use these as guidelines but never as rules to be applied to everything.
- Low aperture: My typical f-stop for flowers is between 2.8 – 5.6. It depends on how much of the subject I want in detail and how far away the background elements are.
- Place the center of the flower – off center. This will create visual tension. It is unexpected and atypical.
- Avoid wind. If your flower is moving it will be blurry, and you will usually want some part of it sharp. If you can’t avoid the wind, raise your ISO up as high as you can without introducing too much noise.
- Use a tripod. When you get in close to a flower, small adjustments can make a big difference. It’s hard to do that when your body is moving. Putting a camera on a tripod will allow you to make these incremental adjustments and maintain your composition before you take the shot.
 You really don’t need special equipment to take great flower pictures. This image of the yellow gerber daisy was taken with my iPhone.
 If you do get hooked on shooting close-up images I would encourage you to explore the world of macro photography. I find it really exciting to view my everyday world in a different way (and of course bought the special equipment). This image of a purple flower with a dew drop was taken with a Lensbaby and a macro kit. To see more of our photographs, go to www.pamphotography.com.


Leave a comment