

Late winter is a great time to shoot sunset pictures in Southern California and the Southwest because the sun is at a lower angle to the horizon which means flatter, warmer, yellower light; the sunset is not too late and not too early (around 5 PM right now); and, the atmospheric conditions based on air moisture and temperature are ideal ( a little Los Angeles smog helps the color, too). What do I mean by that? In order to get the classic pink colored clouds against a blue sky and to get the reds and oranges of the setting sun, you need “high wispy clouds” known as cirrostratus and cirrocumulus. You can also get good color with lower clouds known as alto-cumulus, but the higher the clouds the better. You need to have enough space for the setting sun to bounce light off of the clouds as it dips below the horizon and for you to be able to see and capture them with your camera. I have seen many a promising sunset crash as the cloud cover falls below 10,000 feet and “blocks” the sunlight or is just too low to get any light “bounce.” One exception – you can get a dramatic sunset picture when the setting sun intersects with low clouds. It will not be a big sky shot and will not have reds and oranges, but should have a nice yellow glow. Here are my tips for capturing a good sunset.
1. Predict the quality of the sunset and have a plan. Know exactly when the sun will set using one of many on-line sun and moon calendars (I use several, but like Sun n Moon for iPAD, the best). Check the weather and watch the clouds all day long as you work and go about your day (I use AccuWeather). Practice predicting whether it will be a good sunset or not and why you think so. Even if you can’t get out to shoot, try to watch the sunset and test your predictive abilities. They will improve over time. Also scout out several spots near your home or on the way home from work and know how long it takes you to get there and be ready to take pictures. Yes, this means keep your camera and tripod in the car and ready to go at any moment. I have a spot near my house I can get to in about 5 minutes and I can be shooting in 10. I have another one about 20 minutes away and I have one on the drive home from work.
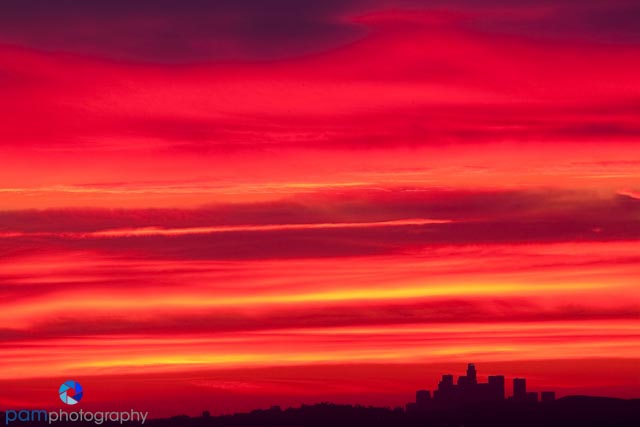
2. Arrive early. I hate rushing to a spot as the sun goes down. My heart is racing and my body and mind are doing too many things at once to really take a good picture. If you have the time and you predict a good sunset, arrive at least 15 minutes before actual sunset. You are calm and collected and can set up your camera in peace while looking around for subjects. I have often seen and captured a good sunset as a cloud intersects the setting sun, only to have the rest of the shoot be a bomb (see picture #1). This way, you can be ready for the light show and get at least one good picture.
#1

3. After arriving early and setting up, look both ways, visualize your composition, and make some test shots. As the sun sets, the light color will get warmer and more yellow behind you. If you have mountains, especially snow-capped, wow, you will get a great yellow and gold glow against the snow. Look back at the setting sun and watch it go down. You may or may nor have a good shot here. (Warning: don’t look directly into the sun and don’t leave your camera with the lens open toward the sun for any length of time). Now the real fun starts. The clouds farthest east will begin to glow with color and the color will march from east to west. Since you know this will happen, visualize your best composition and wait for the color to come to you. If you do not have a strong foreground subject and you are just shooting the sunset, the sky, and a bit of shadowed ground, and have a DSLR, I recommend you shoot in manual mode, f16, turn off all autofocus and image stabilization (because you are using a tripod – right?!), manually set the lens focus to infinity, and use the self-timer or, better yet, cable release. If you have a point and shoot or prefer to use the automatic settings on the DSLR, just watch out for overexposure based on what your camera is metering. I think with sunsets, better to underexpose than overexpose. You will get more color. Compose the picture with a third or or even less in the black foreground. Just a bit of black anchors the sky to the ground (see picture #2).
#2

4. Some Equipment options. Use filters. Filters will make a big difference. If you have not invested in a graduated neutral density filter (like Singh-Ray), you will want to in order to get the most out of the sunset. If you have a great foreground subject that you want to see in the final picture, you will need a “grad” to darken the bright sky and allow you to expose for the darker foreground. Without it, you will get a black foreground, which is fine in most cases. Lastly, I have been known to use a warming filter to get a kick on the reds. With all of the software available now days, this is not necessary and you can always use a red filter later in the NIK software programs. Use a Wide Angle focal length. For opportunities near my house, I usually use a 24-105 mm lens which gives me a lot of options for how “big or small” to make the sky. I also use a long telephoto for shots of downtown Los Angeles from my favorite spot. If you only have one choice – go wide.
5. Stay Late. I have seen many people pack up after the sun sets below the horizon. Those in the know, stay. The best light is usually the next 30 minutes after the actual sun sets. You will have plenty of time to capture the pink clouds and other color as it slowly moves from east to west. I have found that many times the “best” shot is about 15-20 minutes after the sunset. This is just an estimate. The higher the clouds, the longer the show. One time on Little Round Top at Gettysburg, Mary and I watched the sunset with about 200 people. After it went down, three people stayed – all photographers. The next 20 minutes was the best sunset we have ever seen (see pictures #3-4). Lastly, I know we are watching the sunset to capture a beautiful image, but also remember to have fun and enjoy the show. To see more of our pictures, please go to http://www.pamphotography.com/.
#3 (before sun went below the horizon) #4 (15 minutes after sundown)


Leave a comment