
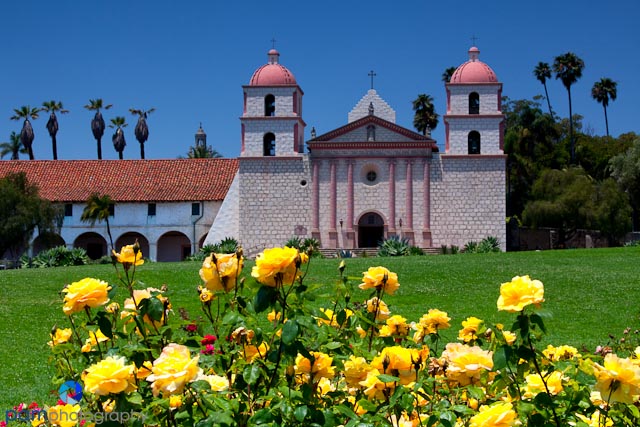

One of Mary’s many photography projects is to photograph every California Mission. When we plan our trips within CA, we always try to squeeze in a mission, if we can. This past summer we got a chance to visit three, in pretty quick succession. Here are a few hints for making photographs at a mission (or all of them).
There are twenty one CA missions between San Diego and San Francisco. They are all about 35-50 miles from each other – “a day’s ride in the late 1700s.” They were built between 1769 and 1823. All of them were destroyed at one point or another in their history. Many have been rebuilt as new parish churches or according to the original plans. Of the 21 missions, we have been to 8, so far. Here is our mission punch list.
Photograph the Façade

Some missions are accessible from the street at all times and you can make a photograph early in the morning or evening to get that golden hour light (like the cover photo of Santa Barbara). Others are behind walls and fences, so you should do a little research before you go. Many are working Catholic parishes, so you will want to avoid Saturday night and Sunday morning mass.

No matter what, Mary and I always try to get there before it opens to get morning light, but also to avoid the crowds. Look for the “classic post card” shot of the front of the mission with the bells, front door, and entrance. This is a good start. After that, see if you can get some creative angles.
Photograph the Interior


After I feel like I have a good photo of the Façade, I urgently try to get one inside before the crowds show up. All of these missions will be very dark inside and they will have bright light streaming through high windows. It can be a tricky lighting situation. I like to make sure I get one of the altar and one of the entire church from the rear. I have used both long exposures – up to 30 seconds, and high dynamic range (HDR) photos to get all of the detail in the darkest and lightest areas. This is a really fun shot, but can get frustrating with all of the people walking in and out of the building.

Photograph the Portico


Every mission we have seen has beautiful porches that are quite inviting. They always have nice wooden benches and are long, therefore being a great subject to show perspective. You have a couple of choices about angles and light. I usually like a bench in the foreground to create a strong subject and then let the photo run out.

Photograph the Camino Real Bell
The missions are on the famous road – the Camino Real. You will see the bells on highway 101 and CA 1 along the coast. Each mission has at least one bell near the main building. Find it and see if you can get a good background.


Photograph Father Junipero Serra
Every mission will also have a statue of Father Serra. Sometimes he is right out front and very prominent and sometimes he is tucked in the back in the garden. These can get messy if there is too much foliage around. We also have seen terrible light and in one case, was rained out in San Luis Obispo. We have had mixed results so far, but we will keep trying.

Photograph the Fountain
Each mission also has a fountain in the front or in the courtyard. Again, move around to get a big shot, but also get some details.

Photograph the Courtyard
Most missions have a huge courtyard adjacent to the main church. These are filled with fountains, gardens, and sometimes graveyards. We like to walk through them slowly and look for big and small subjects.


Researching, driving to, and photographing the CA missions is an enormously gratifying experience. There is the history that is interesting, especially if you were born and raised in CA, as I was. There is the sheer beauty of these magnificent churches. There are interesting and beautiful subjects around every corner. My only caution is that if you want to make really nice photos, you will need patience, even more than usual. These are pretty crowded public places and I prepare myself to go very slowly and to be patient and wait. When we were in Carmel last, I waited nearly 30 minutes in the front of the church to get the exact shot I wanted. There were many people walking about and I just waited until the right moment and it happened. I have had the same experience inside Santa Barbara, where I was doing 30 second exposures and Mary was guarding the door to the church to politely ask people to wait as my exposure finished.


There are numerous books about the missions. We like The Missions of California by Bill Yenne – see this month’s book review. To see more California Mission photos and all of our other photos, please go to www.pamphotography.com.


Leave a comment